Deck Staining Round Rock protects the wood from harmful UV rays. It also adds color, hides dirt and grime, and keeps the deck dry.
Be sure to use a stain that penetrates the wood pores rather than sitting on top of it like paint or urethane. Avoid using a film-forming stain, as it will peel over time.
Aside from having a wide array of color options, oil-based stain can help you achieve a deep richness of color that isn’t available in water-based stains. Oil based stains work by penetrating the wood pores and fibers. This allows the stain to bind with the wood, creating multiple layers of protection and increasing longevity of your deck’s finish. They also offer a natural appearance and will accentuate the wood grain better than paint.
To apply an oil based stain, you will need to use a high volume low pressure sprayer. It doesn’t have to be fancy, just a standard pump up garden sprayer that you would use to spray weed killer or insecticide will do the trick. It’s important to spray the stain in long even strokes, working on one section at a time. It is also helpful to start at the highest features of your deck, like railings and then work down to the boards. This will prevent you from getting a puddle of stain that can be difficult to wipe off, especially on the stairs.
Once you have sprayed the stain, let it dry for about an hour or so. You will then want to come back and wipe off any puddling of stain that did not soak into the wood. This is a crucial step as leaving pools of stain on the deck can trap moisture, which can lead to mold and mildew growth. It will also create a tacky and sticky surface that can interfere with the stain’s ability to fully dry and cure properly.
Once you have wiped off any excess stain, you will then need to apply another coat. The best way to go about this is by using the same technique as you did with the first coat. It is also a good idea to apply a topcoat of clear coat as this will help seal in the color, making your finish last longer. This will also protect your stain against harsh weather conditions and aging. The clear coat will also allow you to see any areas that need additional attention and touch ups.
Water-Based Stains
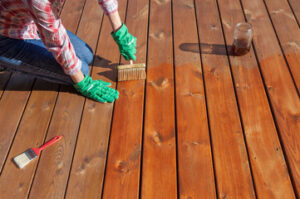
When staining a wood deck it’s important to choose the right technique. For a wide area you can use a pressurized sprayer (which requires a lot of cleaning), or a brush, or you can choose to use a large pad applicator. This allows you to cover a much larger surface at one time, and it’s a very convenient way to work if you’re staining a large deck or fence.
Before you start your project, lay down drop cloths around the areas where the stain is going to be applied. This will protect the surface underneath as well as any plants or furniture that you don’t want to get stained. Also, it’s a good idea to put down some sort of protective covering over any stairs or railings as the stain may drip down during the application process.
It’s also a good idea to read the product label and technical data sheet or safety data sheet for detailed application instructions. These will tell you the proper equipment to use, and will give you specifics about how many coats of stain are needed and what type of stain will work best for your project. You should also do a test patch in an inconspicuous area, and allow it to cure completely before you apply any stain to your whole deck.
The reason you’re doing this is to make sure that you will be happy with the results, and it will help you to avoid any costly mistakes in the future. Once you’ve completed the test patch, it’s time to begin.
Most water based stains will need two coats to achieve the desired color. Lighter colors will require fewer coats than darker colors. The most important thing to remember is that the stain can only penetrate into the pores of the wood, and it can’t form a film on top of the wood like paint or urethane.
Most water based stains are mildew resistant and will provide some protection from the sun. Look for a stain with a built in UV absorber which will further protect the wood. There are a number of new stain technologies that are coming onto the market that will offer even more protection and a great finish for your deck.
Solid Color Stains
A deck is the perfect place to relax after a long day or entertain guests. But over time, factors like rain, snow, pets and foot traffic can cause it to deteriorate in appearance as well as color. Fortunately, you can transform a ragged deck into a work of art with a fresh coat of stain.
Before applying any type of stain, you need to prepare the wood. This includes sanding the surface of the deck. Remember to wear a mask to avoid inhaling the dust created by this process. Once the wood is completely dry, you can start the staining process. First, lay down some painter’s tape along the area where the exterior of your home meets the deck. Then, put down a drop cloth and cover any plants that you don’t want covered with stain. Pour the stain into a paint tray and use a roller with an extension handle to apply a thin coat of stain on a two-to-three-board section of the deck. Repeat this process until the entire deck is covered.
Staining your deck should be done during the cooler parts of the day. It’s also best to work in one small area at a time, maintaining a wet edge along the wood. This will prevent you from working yourself into a corner and ensure that you’re covering the entire surface of your deck.
If you’re using a transparent stain, be sure to apply the first coat while the deck is still wet. Otherwise, the stain will not penetrate into the wood and will look patchy once it dries. This is also important if you’re using semi-transparent or semi-solid stains, which hide the natural grain of the wood and offer less UV protection than a transparent stain.
When using solid or opaque stains, be sure to let the first coat of stain dry for twenty-four hours before adding the second coat. The same applies to any wood sealers that you may be applying as well. These products are designed to dry slowly, and if they’re applied on a blistering hot day, they can actually burn the wood. This will cause the sealer to flake once it dries, which will leave you with a patchy and uneven deck.
Semi-Solid or Semi-Opaque Stains
A semi-transparent stain allows some of the natural wood grain to show through while offering added color. The opacity is slightly higher than a transparent stain, but still lighter than a solid stain. This type of stain may be used to enhance the wood’s appearance, but it is also an excellent choice for newer decks or those that have been previously stained with a clear or solid stain that has begun to fade. It will provide increased longevity and durability while further concealing any flaws in the wood. This type of stain will not oxidize and will not peel, crack, or blister like a solid stain, but it will eventually fade to a different shade than the original. If the owner decides they want to change the color of their deck, a semi-transparent stain can be easily switched out for another color of solid stain.
When using a semi-transparent stain, it is important to plan your workflow. Begin at an exit point of the deck such as a door or stairs, and work towards it so that you don’t stain yourself into a corner. Using a synthetic brush or roller with a short nap, apply the stain and then immediately rub with the grain. This will help the stain to penetrate into the small nooks and grooves of the boards and look more even. Be sure to check frequently for pools of stain that don’t soak in and wipe them up with a rag.
If you are unsure about what color or opacity of stain to choose, start by doing a test area on scrap decking. Then let the test area dry to see how lap marks look. If you don’t like the look, try a lighter or darker stain.
It is also important to consider the weather when staining your deck. Choosing a day with moderate temperatures and low humidity is ideal, so the sealer will not dry too quickly. Using a pressure washer to remove any dirt or mildew on the surface is also helpful before starting the staining process. This will also allow the wood to breath and help prevent any problems that might arise from excess moisture.